Kubernetes established it’s so called Container Storage Interface (CSI) to enable storage vendors to build a plugin, so that their storage plays nicely with Kubernetes and the vendor specific features (like snapshots) can be used on a Kubernetes cluster. Lately, I found out, that Synology provides an open source CSI driver which can do online volume resizes, snapshots and so on. So, I tried it out.
Having a Synology NAS to play around is the obvious prerequisite to get started with this project. Some free space on it to provision an iSCSI volume on it is another one. Even if the Synology driver can also privision Samba / CIFS shared as volumes to your Kubernetes cluster, we will focus purely on iSCSI here. To use iSCSI on your Kubernetes nodes / cluster, you will need the iscsiadm utility installed on all Nodes on your cluster. In my case, having Ubuntu as a distro, I needed to install the open-iscsi package via apt.
Like in my other blog posts, you can find all below listed manifests and Kustomize overlays in my Github repository. This time I strongly suggest to clone the repository because of the many components / manifests involved.
The deployment is separated into two parts. One (in the base directory), deploys everything you need from Kubernetes to do so called volumeSnapshots (see here for more information). This includes all CRDs as well as a snapshot controller deployment. The second part (in the overlays/synology-csi directory) includes the actual Synology CSI driver deployment. More information on the Synology CSI driver project can be found here.
You have to configure your personal Synology NAS settings in two places. First, the client-info.yml file. Here you put your actual connection information to your Synology NAS. From this config file, a Kubernetes secret resource will get generated during the build phase, which will be mounted into the Synology CSI driver pods later.
---
clients:
  - host: 192.168.1.10
    port: 5001
    https: true
    username: dsmuser     # Your DSM username
    password: Supersecret # DSM password

#host:                      # ipv4 address or domain of the DSM
#port:                      # port for connecting to the DSM
#https:                     # set this true to use https. you need to specify the port to DSM HTTPS port as well
#username:                  # username
#password:                  # password
You are allowed to provide more than one host within this configuration file (maybe you have a Synology HA setup). Provide the correct IP of your NAS, the DSM port, username and password.
The second place you need to adjust is the storageclass.yaml. Here you reference the above configured NAS configuration as well as the NAS volume you want to place the iSCSI volume on. You may also adjust the actual filesystem that the blockdevice will get formated. I stayed with ext4 here even if btrfs is a supported option.
apiVersion: storage.k8s.io/v1
kind: StorageClass
metadata:
  annotations:
    storageclass.kubernetes.io/is-default-class: "false"
  name: synology-iscsi-storage
provisioner: csi.san.synology.com
parameters:
  fsType: 'ext4'
  dsm: '192.168.1.10' # has to be one dsm endpoint configured in the client-info.yml
  location: '/volume3' # specifies the volume you want to use to provision iscsi volume
  formatOptions: '--nodiscard'
reclaimPolicy: Delete
allowVolumeExpansion: true
Now you’re good to apply the whole Kustomization by using the following command:
kubectl apply -k overlays/synology-csi/A lot of resources will get created. Check especially for the pods in the synology-csi and kube-system namespace. In the end, on every Kubernetes cluster node, a Synology CSI pod needs to run. Along with the synology-csi-controller and synology-csi-snapshotter.
Now let’s try to create a persistent volume which should use the created storageClass. You can find a working example in the manifests/pvc.yaml file. It looks like this:
apiVersion: v1
kind: PersistentVolumeClaim
metadata:
  name: syn-iscsi-test
  namespace: synology-csi
spec:
  accessModes:
  - ReadWriteOnce
  resources:
    requests:
      storage: 1Gi
  storageClassName: synology-iscsi-storage
Applying the pvc.yaml file, will create a persistentVolumeClaim.
> kubectl apply -f manifests/pvc.yaml

persistentvolumeclaim/syn-iscsi-test created

❯ kubectl describe pvc syn-iscsi-test -n synology-csi
Name:          syn-iscsi-test
Namespace:     synology-csi
StorageClass:  synology-iscsi-storage
Status:        Bound
Volume:        pvc-b98d4bd6-6857-46bf-8fee-c7ad4a23b05a
Labels:        <none>
Annotations:   pv.kubernetes.io/bind-completed: yes
               pv.kubernetes.io/bound-by-controller: yes
               volume.beta.kubernetes.io/storage-provisioner: csi.san.synology.com
               volume.kubernetes.io/storage-provisioner: csi.san.synology.com
Finalizers:    [kubernetes.io/pvc-protection]
Capacity:      1Gi
Access Modes:  RWO
VolumeMode:    Filesystem
Used By:       <none>
Events:
  Type    Reason                 Age   From                                                                   Message
  ----    ------                 ----  ----                                                                   -------
  Normal  Provisioning           41s   csi.san.synology.com_vmkubenode2_dc357a12-427c-4602-9731-82629bd43aa0  External provisioner is provisioning volume for claim "synology-csi/syn-iscsi-test"
  Normal  ExternalProvisioning   41s   persistentvolume-controller                                            waiting for a volume to be created, either by external provisioner "csi.san.synology.com" or manually created by system administrator
  Normal  ProvisioningSucceeded  38s   csi.san.synology.com_vmkubenode2_dc357a12-427c-4602-9731-82629bd43aa0  Successfully provisioned volume pvc-b98d4bd6-6857-46bf-8fee-c7ad4a23b05a
From Kubernetes side, this looks fine. Let’s check on our Synology NAS in the SAN Manager.
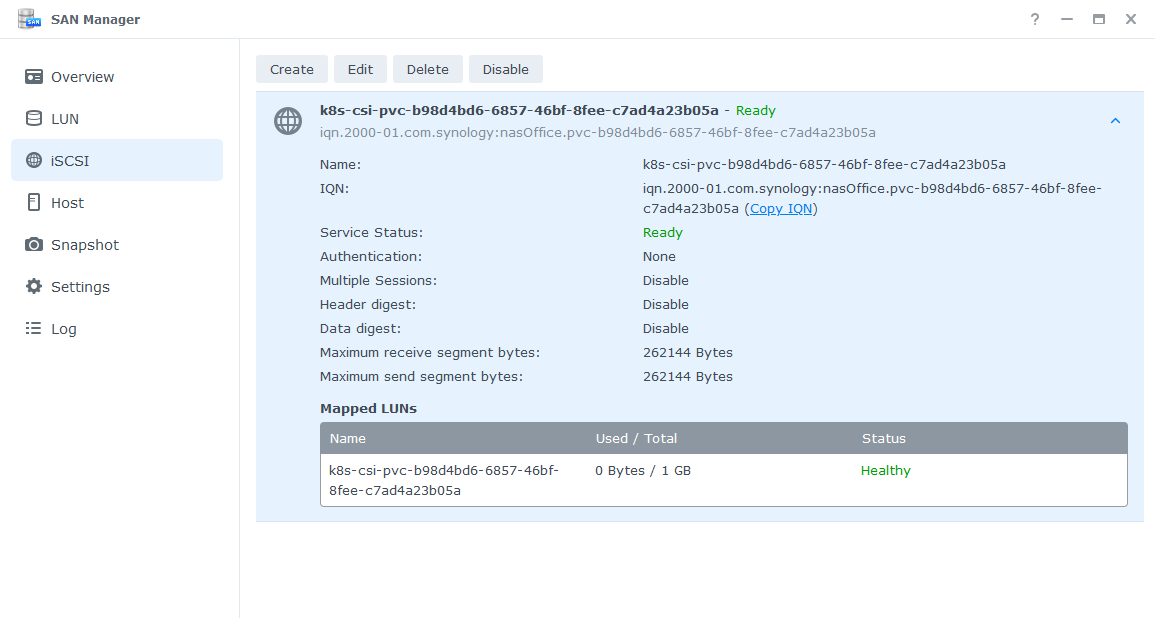
Here we can see that the volume was properly created and is in state “ready”. Now we want to use the pvc within a pod. You can apply the manifest file manifests/pod.yaml to do so.
❯ k apply -f pod.yaml
pod/task-pv-pod created
Let’s wait a bit and check the logs of your synology-csi-node pod(s). You should find a log entry like the following:
csi-plugin 2023-09-08T15:54:49Z [INFO] [driver/initiator.go:188] Login target portal [192.168.1.10:3260], iqn [iqn.2000-01.com.synology:nasOffice.pvc-b98d4bd6-6857-46bf-8fee-c7ad4a23b05a].
csi-plugin I0908 15:54:51.064218       1 mount_linux.go:408] Disk "/dev/disk/by-path/ip-192.168.1.10:3260-iscsi-iqn.2000-01.com.synology:nasOffice.pvc-b98d4bd6-6857-46bf-8fee-c7ad4a23b05a-lun-1" appears to be unformatted, attempting to format as type: "ext4" with options: [-F -m0 /dev/disk/by-path/ip-192.168.1.10:3260-iscsi-iqn.2000-01.com.synology:nasOffice.pvc-b98d4bd6-6857-46bf-8fee-c7ad4a23b05a-lun-1]
So the disk was unformatted and the driver did so. When opening a shell in the newly create pod (task-pv-pod), and check for the volume mounted unter /usr/share/nginx/html, we see, that it has the specified size of 1GB. Let’s create a file or two in there, to verify if the snapshot restore worked later.
cd /usr/share/nginx/html/

touch file1
touch file2

ls -ltr
drwx------ 2 root root 16384 Sep  8 15:54 lost+found
-rw-r--r-- 1 root root     0 Sep  8 16:32 file1
-rw-r--r-- 1 root root     0 Sep  8 16:32 file2
Now it’s time to try out the snapshot feature. You can do so by applying the volumesnapshot.yaml file which created a volumeSnapshot resource.
❯ kubectl apply -f volumesnapshot.yaml
volumesnapshot.snapshot.storage.k8s.io/new-snapshot-test created

❯ kubectl describe volumesnapshots.snapshot.storage.k8s.io -n synology-csi new-snapshot-test
Name:         new-snapshot-test
Namespace:    synology-csi
Labels:       <none>
Annotations:  <none>
API Version:  snapshot.storage.k8s.io/v1
Kind:         VolumeSnapshot
Metadata:
  Creation Timestamp:  2023-09-08T16:34:52Z
  Finalizers:
    snapshot.storage.kubernetes.io/volumesnapshot-as-source-protection
    snapshot.storage.kubernetes.io/volumesnapshot-bound-protection
  Generation:        1
  Resource Version:  147950373
  UID:               6f90312a-fa36-4c89-8162-40069357bc93
Spec:
  Source:
    Persistent Volume Claim Name:  syn-iscsi-test
  Volume Snapshot Class Name:      synology-snapshotclass
Status:
  Bound Volume Snapshot Content Name:  snapcontent-6f90312a-fa36-4c89-8162-40069357bc93
  Creation Time:                       2023-09-08T16:34:53Z
  Ready To Use:                        true
  Restore Size:                        1Gi
Events:
  Type    Reason            Age   From                 Message
  ----    ------            ----  ----                 -------
  Normal  CreatingSnapshot  27s   snapshot-controller  Waiting for a snapshot synology-csi/new-snapshot-test to be created by the CSI driver.
  Normal  SnapshotCreated   25s   snapshot-controller  Snapshot synology-csi/new-snapshot-test was successfully created by the CSI driver.
  Normal  SnapshotReady     25s   snapshot-controller  Snapshot synology-csi/new-snapshot-test is ready to use.
Doublechecking the Synology NAS SAN Manager again, we can see the newly created snapshot.
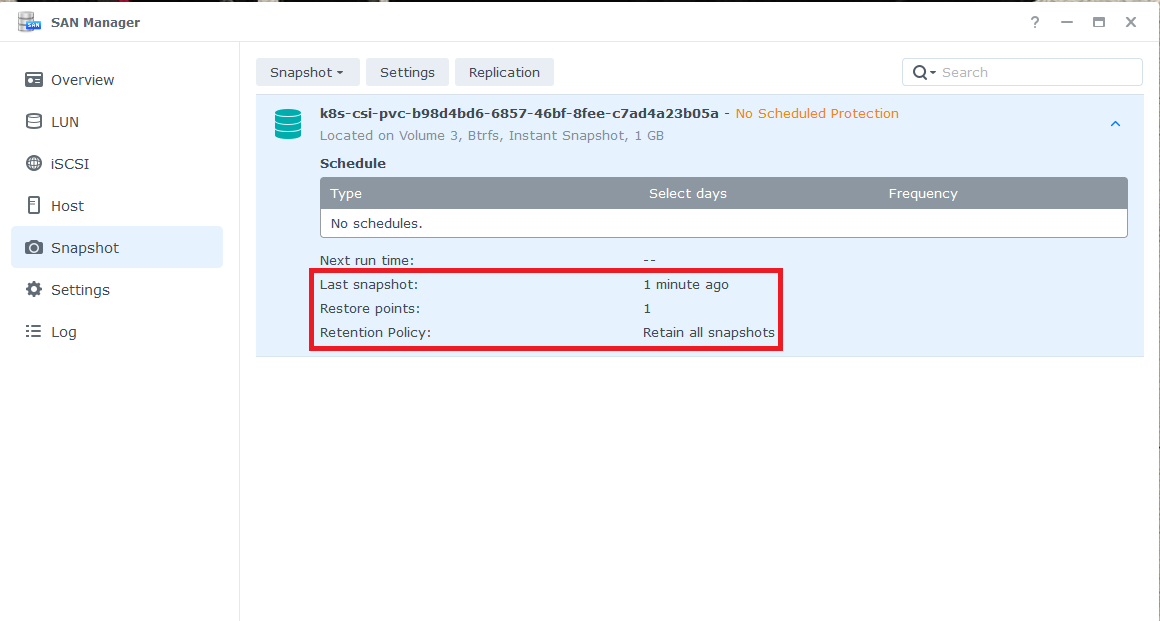
You can see, that we have one existing snapshot. Synology enables you to create snapshots also triggered from the NAS itself and also to setup some retention policy. But we leave that aside for now.
Ok, now we create another file on the volume (file3) to verify, that we have only two files when we restore the snapshot. Restoring a snapshot means, that you clone a volume and the referenced snapshot to a new volume. There is a prepared manifest under manifests/pvc-snapshot-restore.yaml.
❯ kubectl apply -f pvc-snapshot-restore.yaml
persistentvolumeclaim/restore-pvc created

❯ kubectl get pvc -n synology-csi
NAME             STATUS   VOLUME                                     CAPACITY   ACCESS MODES   STORAGECLASS             AGE
restore-pvc      Bound    pvc-1dbbfa8c-270c-4a50-b36a-aa8bde15aff0   1Gi        RWO            synology-iscsi-storage   45s
syn-iscsi-test   Bound    pvc-b98d4bd6-6857-46bf-8fee-c7ad4a23b05a   1Gi        RWO            synology-iscsi-storage   54m
Checking the SAN Manager on your NAS again, you will see a second volume appeared. Apply the pod-snapshot-restore.yaml manifest. A new pod will spawn using the newly cloned volume. Shell into the pod and control the /usr/share/nginx/html folder for its content.
cd /usr/share/nginx/html/
ls -ltr

total 16
drwx------ 2 root root 16384 Sep  8 15:54 lost+found
-rw-r--r-- 1 root root     0 Sep  8 16:32 file1
-rw-r--r-- 1 root root     0 Sep  8 16:32 file2
Time to clean up. While doing so, I experienced something, that troubles me a bit. From other storage providers I know, that you can’t delete a pvc / pv while a snapshot for this volume exists. This doesn’t seem to be the case here. The volume will get deleted and with it the iSCSI volume on your NAS. Leaving the volumeSnapshot resource useless. Maybe there is a configuration parameter within the volumeSnapshotClass or the storageClass that I’ve missed. I will have to investigate this further I feel.
Philip